Showing posts with label Recipe. Show all posts

Wednesday, August 7, 2013

BBQ Coka-Cola Ribs

In my house there one disagreement: to Coke or not to Coke. I can't stand the stuff. My husband has to detach his coke IV to take a shower. I've never been much of a soda drinker. It's just not my thing. But when Adam spent two years of his life in Mexico where water is "no bueno" the replacement was Coke. He brushed his teeth with the stuff for crying out loud. You can imagine Adams excitement when I told him about a recipe for Coke Bar B Que sauce I came across a few weeks ago. COKE + BBQ = Happy Adam. We decided to smear said bar b que sauce on some meaty pork ribs. And here's were things get really Coke-y before finishing the ribs on the grill, they get boiled in a Coke bath until cooked through. COKE + COKE + BBQ = Ecstatic Adam. Let me remind you that I'm not Coke fan BUT wow these ribs were GREAT. They were tender and juicy and the bbq sauce was sticky and smokey and so perfect. If you have a Coke lover in your life, make their day and grill up some Coke ribs!  


Bar B Que Coka-Cola Ribs
Ingredients: 
For the Ribs1 (1.5 liter) bottle of Coca-Cola (not diet)
1 large onion, quartered
6 cloves garlic, peeled and smashed
2 bay leaves
1 tablespoon whole black peppercorns
2 racks baby back ribs (about 4 pounds)

For the Sauce
2/3 stick unsalted butter
1 small white onion, diced
2 cloves of garlic, minced
1 cup ketchup
1½ tablespoons yellow mustard
¼ cup dark brown sugar
1 teaspoon Worcestershire sauce
1 (12 ounce) can Coca-Cola (not diet)
Kosher salt and freshly ground black pepper, to taste

In a large pot, add the (1.5 liter) bottle of Coca-Cola, onion, garlic, bay leaves and peppercorns. Add the ribs and, if necessary a bit of water just to ensure the ribs are submerged completely. Bring to a boil and reduce heat to a simmer, turning the ribs occasionally, until the meat pulls away from the bone, about 1 hour.

Meanwhile, to make the sauce combine the butter, onion, garlic, ketchup, mustard, brown sugar, Worcestershire sauce, and (12 ounces) Coca-Cola in large heavy sauce pan. Bring to a boil and reduce heat. Simmer for about 25 minutes stirring often until sauce is thickened and reduced. Season to taste with salt and pepper and let cool slightly. Using a blender, puree the sauce.

Preheat the grill to high.

Remove the ribs from the pot, pat dry, season with salt and pepper and brush liberally with the sauce. Grill, turning often, until charred on the outside, about 8 minutes. Loosely tent the ribs with foil and let rest for 5 minutes before cutting into individual ribs. Serve extra sauce on the side for dipping.


Monday, July 22, 2013

Summer Berry crisp

This has to be the perfect finish to a meal on a warm summer evening. Sweet warm berries, cinnamon-y crumbly crust and cold vanilla ice cream. Perfection I tell you. I'm really in to seasonal cooking, it just makes sense...right? While berries are at their peak of freshness this dessert needs to be on your to do list. Let this be the reason you head to the farmers market this weekend.


Summer Berry Crisp

For the Berries: 4 pints fresh berries, any combination of raspberries, strawberries, blueberries, blackberries
½ cup sugar
1 tablespoon cornstarch
2 teaspoons grated lemon zest
1 teaspoon lemon juice
1 teaspoon cinnamon
2 tablespoons freshly squeezed lemon juice

For the topping:1 cup flour
⅓ cup sugar
⅓ cup brown sugar
¼ teaspoon ground cinnamon
pinch of salt
pinch of nutmeg
½ cup (1 stick) unsalted butter, cut up, at room temperature

In a large bowl combine berries, sugar, cornstarch, lemon zest, cinnamon, and lemon juice. Stir to combine and set aside while mixing the topping. 

Preheat oven to 350 prepare a sheet pan by spreading with a piece of aluminum foil. In a mixing bowl combine flour, sugars, cinnamon, salt, and nutmeg. Using a pastry cutter or your fingers cut butter into dry ingredients until the mixture is a course, dry crumbly mixture.

Spoon berries into 6 small ramekins, or into one large baking dish (a casserole pan or 9X9 baking dish works great here). Sprinkle the berries with topping, place the ramekins on the prepared sheet pan and bake in preheated oven for about 40 minutes or until the topping is golden and berries are bubbling. 

Enjoy warm with a scoop of vanilla ice cream.

Wednesday, July 17, 2013

Fresh Strawberry Pie

When I was a kid strawberry pie was my favorite. In the warmer months my grandma would make it and I would be sure to eat it the only way I knew how equal parts pie and whipped cream. 1:1, pie to cream ratio is the only way to go. Truth be told not much has changed today. In fact recently when I made this pie I made little 4'' mini pies and for the sake of cuteness I piped on a little dollop of whipped cream in the center of each pie. But you better believe when it was eating time I sat with my pie AND piping bag, piping individual dollops of cream on each bite. It felt right and I'm not ashamed. This strawberry pie sets up beautifully, it's not runny and yet it's not gel like either. It's the perfect consistency. Big strawberry chunks create a great texture and an even better flavor. You'll love this pie, pick up some fresh strawberries and try it out! 


Fresh Strawberry Pie 
Ingredients: 
9'' blind baked pie crust or four 4'' mini pie crusts
6 cups strawberries, hulled and cut in half
1 cup sugar
3 Tablespoon cornstarch
1/2 cup water
3 ounces cream cheese, softened

Sweetened Whipped Cream 
Ingredients:
1 cup whipping cream
2 Tablespoon powdered sugar
1 teaspoon vanilla

Mash enough strawberries to measure one cup. Mix sugar and corn starch in a saucepan. Gradually stir in water and mashed berries. Cook mixture over medium heat, stirring constantly until the mixture begins to thicken. Allow mixture to come to a boil, boil and stir for one minute. Cool mixture while you spread softened cream cheese on the bottom and sides of pie crust. This will keep the crust from getting soggy. Fill the shell with remaining strawberries, then pour cooked strawberry mixture over the top of fresh berries. Refrigerate pie until set, at least 3 hours. Enjoy with sweetened whipped cream.

* For the mini pies the process is the same, as for a 9'' pie, berries may need to be cut in fourths as opposed to just in half. And cooling/set up time could be a bit less as well.

Tuesday, July 2, 2013

Coconut Lime Grilled Chicken

Eating healthy can be difficult. Adam and I can attest to this truth. Healthy foods can get boring, sometimes it  feels like you are constantly eating the same exact thing for every meal. Enter coconut lime chicken. It's meals like this that throw all that out the window. It's healthy but it doesn't taste like it. This is the type of meal that even unhealthy eaters can appreciate. Moist flavorful chicken sits on top of coconutty brown jasmine rice, it's all so exotic and delicious. Serve it with steamed veggies and you'll have yourself one yummy AND balanced meal! Try this recipe for dinner you'll be glad you did!

Coconut Lime Chicken 
Ingredients:
3 tablespoons olive oil
Zest and juice of 1 lime
1 teaspoon ground cumin
1 1/2 teaspoons ground coriander
2 tablespoons soy sauce
1 1/2 teaspoons salt
2 tablespoons sugar
2 teaspoons curry powder
1/2 cup canned light coconut milk
pinch cayenne pepper
2 pounds boneless, skinless chicken breasts
1/4 cup chopped fresh cilantro
Fresh limes, cut into wedges
Coconut Rice:1 cup jasmine rice (Brown or White)
1 cup canned light coconut milk
1 cup water
1/2 teaspoon salt

In a medium bowl, whisk together the oil, lime zest, lime juice, cumin, coriander, soy sauce, salt, sugar, curry powder, coconut milk, and cayenne pepper. Place the chicken in a large ziploc bag and pour the marinade over the chicken. Seal the bag and refrigerate for at least 2 hours and up to 8 hours.
For the coconut rice, bring the rice, coconut milk, water and salt to a simmer in a medium saucepan. Cover, reduce the heat to low and simmer for 15-16 minutes until the liquid is mostly evaporated. remove from the heat and let stand for 10 minutes before fluffing with a fork and serving.
Preheat a charcoal or gas grill (see note above if not grilling) to medium-high heat. Grill the chicken for 6-7 minutes per side (actual time will depend on the thickness of the chicken). Chicken can be cooked in a skillet if a grill is not available.
Serve chicken over rice sprinkled with chopped cilantro and lime wedges.

Friday, June 21, 2013

Garlic and Herb Focaccia

One time I made focaccia bread at home. When it was done it smelled like garlic and herbs. I let it cool and then I made sandwiches loaded full of delicious things. I even cut off the edges intending to make croutons. 
I snacked on them instead. It seemed like the right thing to do.  Fresh focaccia is like a tiny piece of heaven. Right in your mouth. One thing to be aware of when making this particular focaccia bread is that the taste of your olive oil will be very prevalent. It's important to use good quality olive oil, some oils found at grocery stores today are less than focaccia worthy. So be sure to break out the good stuff for this recipe. 

Garlic and Herb Focaccia Bread

Ingredients:
2 3/4 cups all-purpose flour
1 teaspoon salt
1 teaspoon sugar
2 1/2 teaspoons instant yeast
1 large clove garlic, finely minced
1 tablespoon fresh rosemary, chopped
1/2 tablespoon fresh thyme, chopped
1/2 teaspoon dried oregano
1/2 teaspoon dried basil
1 tablespoon olive oil
1 cup warm water
In a large bowl (or the bowl of a stand mixer), mix the flour, salt, sugar, and yeast. Mix in the garlic and herbs. Pour in the water and olive oil and mix until the dough comes together, by hand or with a dough hook attachment, if using a stand mixer. Knead the dough until it has pulled away from the sides of the bowl (adding additional flour only if necessary – the dough will get less sticky as it kneads), about 4-6 minutes. The dough should be soft and pliable but not overly stiff. Likewise, it shouldn’t leave a lot of sticky dough residue on your fingers. The goal is a soft, supple dough.
Cover the bowl with lightly greased plastic wrap and let the dough rise for 30 minutes, until it is puffy. Deflate dough and allow to rest for 5 minutes.
Preheat the oven to 425 degrees F. Lightly grease a large, rimmed baking sheet and with your hands, spread the dough out roughly an 8x10 rectangle. Use your knuckles or fingertips to make indentations over the dough, about every 1/2 inch. Lightly brush dough’s surface with olive oil and bake for 15 to 20 minutes, until golden brown.
Immediately after removing from the oven, stir together 1 tablespoon olive oil and 1/2 teaspoon salt and brush over the surface of the hot bread. Tear or slice into pieces and serve.


Monday, June 10, 2013

Strawberry Rhubarb Pie

I attempted to make strawberry rhubarb pie 3 times, I was successful just once. Each time I failed because I was missing one of the key ingredients.  Rhubarb. The first time I attempted to make my husbands favorite treat was in early April, granted a little premature for rhubarb, but I was hopeful. I called every grocery store within 20 miles of me crossing my fingers that I would find some rhubarb. Unfortunately there was none. None! It was too early in the season. I tried a couple more times and it was still a tad too early. Then there were vacations, and life just got in the way. So finally one weekday night last week I did it! I made strawberry rhubarb pie, and Adam was in heaven. I had one ball of pie dough in my freezer and didn't want to make more for a top crust, so I decided to make a crumble topping. And boy am I glad I did. It's like crisp meets pie and everything is right in the world. Bitter rhubarb becomes surprisingly sweet when mixed with fresh strawberries, and sugar. Everything gets freshened up with a squeeze of lemon and a sprinkle of cinnamon. You're going to love this. Don't fear the rhubarb. Embrace it. Top this tasty pie with a dollop of fresh whipped cream and you'll wonder why you didn't make this months ago.


Strawberry Rhubarb Crumble Pie 

Ingredients: 
1 recipe double-crust pie dough of your choice (you can half it, or freeze half and do a crumble top or do a double crust pie, whichever you prefer)
3 1/2 cups rhubarb, cut into 1/2-inch thick slices
3 1/2 cups strawberries, hulled and sliced
3/4 cup granulated sugar
1/4 cup light brown sugar
1 tablespoon lemon juice
1 teaspoon cinnamon
1/4 teaspoon salt
1/4 cup quick-cooking tapioca

Crumble topping:
1 cup flour
1/2 cup brown sugar 
1/2 cup butter

Preheat oven to 400 degrees. On a well-floured counter, roll half of pie dough into a 12-inch circle and carefully transfer to a 9-inch pie plate.
Stir together rhubarb, strawberries, sugars, lemon, cinnamon salt and tapioca in a large bowl. For the crumble mix in a separate bowl the flour and sugar cut in butter with pastry blender or fingers, until mixture is course and generally pea sized, being careful not to overwork. Mound strawberry filling inside bottom pie crust. Sprinkle with crumble topping.  
Place pie on a baking sheet and bake for 20 minutes then reduce temperature to 350 degrees and bake for an additional 25 to 30 minutes, until the pie is golden and the juices bubble visibly.
Transfer pie to wire rack to cool. Serve when full cool (several hours later) and the juices are gelled.
Top with ice cream or fresh whipped cream.
 

Tuesday, May 21, 2013

Creamy Chicken Salad

So last week it was like 90 degrees here for a couple of days. My apartment felt like a Sauna. It was much too hot to do anything, especially cook. But alas we had to eat, so instead of pouring myself a hearty bowl of honey nut cheerios I made chicken salad sandwiches. Before you crinkle your nose up at the thought of the bland chicken and mayonnaise combo, hear me out. This chunky, crunchy, chewy, sweet and savory salad came straight from heaven. It starts with a flavorful poaching liquid, in which chicken is cooked until shred-able. Cashews are toasted, herbs chopped, lemon zested, all get tossed with dried cherries, a bit of creamy mayonnaise and of course the shredded chicken. Perfectly paired with baby spinach leaves, or sandwiched between a lightly toasted croissant you'll have your self a pretty great little summertime meal if you ask me. These require very little hot cooking and are refreshing on a warm evenings. They also can be made ahead of time and stored in the refrigerator if that's what you're into.
 
Creamy Chicken Salad:

Ingredients
4 bone in, skin on chicken thighs
4 chicken breasts
1/2 Onion, halved
1 celery stalk, halved
1/2 teaspoon of each dried parsley, sage, marjoram, thyme (or 1 teaspoon poultry seasoning)
1 cup real mayonnaise
1/2 cup toasted cashews, roughly chopped
1/2 cup dried cherries
3 tablespoons fresh tarragon leaves, finely chopped (or 1 ½ teaspoon dried tarragon)
2 teaspoon honey
1 teaspoon Dijon mustard
1/2 teaspoon lemon zest
1/2 teaspoon lemon juice
1/2 teaspoon salt
1/4 teaspoon black pepper
1/4 teaspoon ground cinnamon
To serve
6 large croissants, cut in half and lightly toasted
Fresh spinach leaves

Place chicken pieces, onion, celery and seasoning into a large pot, cover with plenty of water, bring to a boil. Cook until chicken is no longer pink or registers 165 degrees internal temperature. Chicken breasts will probably be done before the thighs, check to make sure all chicken is cooked through. When chicken is finished remove the pieces from the hot water and place them on a sheet pan to cool. When chicken is cool enough to handle remove and discard the skin from the thighs and begin to shred all the chicken into bite sized chunks. Cover chicken and let cool in the refrigerator while preparing the dressing.
In a large bowl gently combine mayonnaise, cashews, cherries, tarragon, honey, dijon, lemon zest and juice, till incorporated. Season with salt, pepper and cinnamon, taste to adjust. Add the shredded chicken when it has cooled to the mayonnaise mixture. Serve cold with spinach leaves and split toasted croissants. Can be made 1 - 2 days in advance.
 
* The chicken to be used in this recipe can be flexible. If you have a whole chicken you'd like to use do that, or use all chicken breasts, or all thighs. However I find a combination of dark and light meat to be the best.
*Another easy alternative would be to use a cooled store bought rotisserie chicken.

Monday, April 8, 2013

Wild Rice Pilaf

A rockin' side dish is one of my favorite dinner time components. Yummy mashed or roasted potatoes seem to be a staple around our table. But more recently this wild rice pilaf has been a regular. It's easy to make and has simple yet delicious flavors. It goes great with just about anything. My favorite things to serve it with is this chicken cordon bleu and these tasty baked chicken breasts. The rice is full of earthy flavor thanks to the mushrooms, and is brightened up with some fresh herbs. It 's all really great. However if mushrooms aren't your thing simply omit them. This rice is quite versatile and most importantly very delicious. 
 

Wild Rice Pilaf
Ingredients:
2 ribs celery, chopped small
1/2 shallot, minced
1 cup mushrooms, halved and sliced
2 tbsp butter
1 cup wild rice blend(such as this one, I can usually find it at Costco)
2 cups chicken broth
1 tablespoon chopped fresh thyme
2 tablespoons chopped fresh parsley
Salt and pepper to taste

In a wide and shallow pot, melt butter. Saute shallot, celery and mushrooms in butter over medium - high heat until they become fragrant and tender. Add rice and toast until pieces begin to brown, about 5 minutes. Add chicken broth, thyme and about a 1/2 teaspoon of salt and pepper each. Cover pot with a tight fitting lid and bring to a boil. Once the mixture has boiled lower heat to a simmer and allow the rice to cook for about 40 minutes, if the rice remains crunchy let it go longer. Just before serving season with more salt and pepper and fresh parsley, tasting to adjust.

*Button or cremini mushrooms work well in this, but I prefer whatever is on sale, and if that's neither I usually choose cremini because of it's mild flavor and small size.

* If you didn't want to use a shallot, you could mince up half of a small yellow onion if that's what you have on hand.

Wednesday, April 3, 2013

Individual Strawberry Shortcakes

I'm not sure there's a dessert that epitomizes spring quite like strawberry shortcake does. It's the perfect spring treat. Sweet strawberries are in season and they pair ever so nicely with fluffy whipped cream. Sandwich it all between a soft and flaky scone and you have yourself one satisfying dessert.
 

Individual Strawberry Shortcakes:

For the Vanilla Bean and Cinnamon Scones:
3 cups flour
1 Tbsp baking powder
1/2 tsp salt
1/3 cup sugar
1/2 tsp cinnamon
1 stick butter, cold
2 eggs
1/4 cup milk, cold
1/4 cup half and half, cold
1 tsp vanilla extract
1 vanilla bean, split and scraped

For the topping:
1 tsp vanilla 
2 tbsp milk 
2 tsp sugar

Preheat the oven to 425 degrees. In a large mixing bowl, mix together the flour, baking powder, salt, and sugar. Using your fingers or a pastry cutter cut the butter into tablespoon-sized pieces and incorporate it into the dry ingredients.

In another large bowl, whisk together the eggs, milk, half and half, vanilla extract, and vanilla bean.
Pour wet ingredients slowly into the dry ingredients incorporating with a wooden spoon or your hands, slowly moistening the flour. Continue to gently work the flour and milk mixture in the bowl until it comes together. Turn the dough out on to a floured surface and gently and briefly knead (or fold) it to finish incorporating the ingredients.

Using your hands shape the dough into a 10'' - 12'' circle (dough should be about 1'' high). Use a rolling pin to even the surface and spread the dough out a little. Using a 4'' biscuit or cookie cutter cut round scones and place them on a parchment lined, or greased sheet pan. Re-roll scraps, being careful to not over work the dough and continue cutting until all the dough has been used. Brush scones with the milk and vanilla mixture then sprinkle with the 2 tsp sugar.
Place the pan of scones in the freezer, uncovered, for about 30 minutes. Remove the scones from the freezer and put them right in the oven. Bake for 15-20 minutes or until light golden brown.
When the scones are done, remove them to a wire rack to cool.

For the Macerated Strawberries:
7 cups strawberries, sliced
2 tbsp sugar
1 lemon, juiced
Zest from 1 lemon

In a large bowl combine strawberries, sugar lemon juice and zest. Gently mix until berries are coated in sugar. Allow mixture to sit in the refrigerator for about an hour, or until the berries have begun to release their juices. (Can be made 4 hours ahead and left to sit in the refrigerator).

For the Sweetened Whipped Cream:
1 pint whipping cream
2 tbsp powdered sugar
2 tsp vanilla extract

In a bowl whip cream until it begins to become thick, add sugar and vanilla and continue to whip until soft peaks form. Taste and add more sugar and vanilla as needed.

To Serve:
Using a serrated knife slice the scones in half, so that it's like a hamburger bun. On the bottom half scoop about a cup of strawberries with their juices and place onto the scone. Top with whipped cream and finish with top half of the scone. Serve immediately.

Tuesday, March 12, 2013

Soft Sugar Cookies

In elementary school my mom was famous. Not for her good looks or ability to kiss boo boos goodbye. No, she was famous for something much more...delicious. Her sugar cookies were known throughout our school district. People begged and pleaded for the recipe, but she kept it secret. As I got older my friends and boyfriends fell in love with my moms sugar cookies. High school parties were never complete without a big platter of my moms "half dips" the term lovingly coined for the famous cookies my mom dipped half in delicious melted frosting. Her cookies are truly a science that she has perfected over the course of a lifetime. The recipe I am sharing today IS NOT her recipe, however it has some similar components and is also very delicious. Like hers, these cookies have a subtle almond flavor and come out of the oven soft as a pillow (and stay that way for days). These sugar cookies are topped with a thick and creamy frosting, perfect for licking off and have hints of lemon throughout the dough. No better or worse than moms - just different. But most importantly delicious! If you're looking for a great sugar cookie give these a try!
 
 
Soft Sugar Cookies
Ingredients:
1 1/2 cups (3 sticks) butter, softened to room temperature
1 1/2 cups granulated sugar
1/2 cup powdered sugar
4 large eggs
1 teaspoon vanilla
1/2 teaspoon almond extract
1 tablespoon lemon zest (from about 1 lemon) chopped finely
5 cups all-purpose flour
2 teaspoons baking powder
1 teaspoon salt
 
Preheat oven to 400 degrees.
 
In a large bowl, cream together the butter and sugars for 3-4 minutes, until the mixture is light and fluffy. Add the eggs one at a time, mixing after each addition. Add vanilla extract, almond extract and lemon zest; mix. Add two cups flour, baking powder and salt. Mix. Add remaining flour and mix just until flour is incorporated and the dough is smooth and soft, being careful not to over mix.
 
Dust the counter with flour and roll the dough to about 1/4-inch thick, maybe even slightly thicker than that, it's your preference. Rolling the dough thick is the important step to get the soft chewy cookies, rolling the dough too thin will make them crispy and unappetizing. Cut the dough into shapes using cookie cutters or even the rim of a cup. Place the cookies on a lined or lightly greased baking sheet. Gather up the scraps and repeat the rolling process until all your dough is used up.
 
Bake for 7-8 minutes. The cookies won’t appear browned on top (or on bottom) when they are done baking so don’t let them over bake! I find 6 to 7 minutes is about perfect but if they are even lightly browned on bottom, I decrease the time by 30 seconds. If they are still really shiny and doughy looking leave them in the oven for an additional 30 seconds.
 
Cool the cookies completely on a wire rack before frosting.

Whipped Cream Cheese Frosting
Ingredients:
1 (8 oz.) block cream cheese, softened
1 1/2 cups powdered sugar
1/8 teaspoon salt
1/2 teaspoon vanilla extract
1 1/2 cups heavy whipping cream

If cream cheese is not softened to room temperature, put it in the microwave for 30 second intervals until it's very soft to the touch. In a large bowl, combine the softened cream cheese, powdered sugar, salt and vanilla. Mix until very smooth and light and no lumps remain. If you are adding color to your frosting do so now to the cream cheese mixture. In a separate bowl, beat the cream to stiff peaks. Add the whipped cream to the cream cheese mixture folding in with a spatula, being careful not to deflate the delicate whipped cream. Mix until well combined and smooth, adjust color if you need to by adding more food coloring and folding gently in. Spread over cooled cookies, and eat refrigerate any left overs.

Monday, March 11, 2013

Italian Sausage and Peppers Ragoût

Last week I mentioned that we made sausage at school, and said that over the weekend I wanted to use it up. I knew I could make an awesome lasagna, or meatball subs, but instead I decided to try something a little different. I pulled a couple different recipes and mashed them together and came up with this beautiful, chunky, Italian mess of noodles and peppers and fresh herbs. I called it a ragoût because that's what it's reminiscent of but technically a ragout is more like a stew that cooks for a long time, so maybe I should call this a quick ragoût. Or maybe I should just call it freaking delicious. That may be more effective. 
 

Italian Sausage and Peppers Ragoût

Ingredients
Olive oil
1 lb Spicy Italian Sausage
1 medium onion, sliced thinly
1 ½ teaspoons salt
1 teaspoon Italian seasoning
½ teaspoon black pepper
1 red bell pepper, cored and thinly sliced
1 yellow bell pepper, cored and thinly sliced
1 orange (or green) bell pepper, cored and thinly sliced
4 cloves garlic, pressed through garlic press
½ cup white white, chicken stock or water
1 (28 ounce) can diced tomatoes with juice
2 tablespoons flat-leaf parsley, chopped
¼ cup fresh basil leaves, julienned, divided
8 ounces rigatoni, uncooked
Shaved Parmesan Cheese
 

Place a large, heavy-bottom pan or braising pot over medium-high heat; add about 2 tablespoons of olive oil, and once the oil is hot, crumble the spicy Italian sausage into the pan in small chunks (you want to keep the sausage fairly chunky), allowing it to brown in the oil for a few moments on each side; once the crumbled sausage is browned, remove it from the pan/pot with a slotted spoon and place into a small bowl to hold for a moment; next, add the sliced onion into the pan with the sausage drippings, and allow it to caramelize and become golden for roughly 5 minutes or so, stirring to keep it from burning (add a touch more olive oil, if necessary); once the onion starts to become golden, add the salt, Italian seasoning and cracked black pepper, and stir to combine, then add in the sliced bell peppers, and allow those to saute with the onion for about 2 minutes until slightly tender and golden. Next, add in the garlic, and once it becomes aromatic, add in the white wine (broth or water) and allow it to reduce for a few moments, until almost completely reduced; next, add in the diced tomatoes with their juice, and return the browned spicy Italian sausage back into the pan, and gently fold the mixture to combine; allow it to gently simmer for about 3-4 minutes to blend the flavors, then turn the heat off; add in the chopped parsley and about half of the julienned basil; stir, and keep warm while you prepare the noodles.

Prepare the noodles according to instructions on package, under cooking by about a minute so that they're still a bit firm. Drain the noodles well, and add them directly into the sauce, using tongs to gently toss and combine the rigatoni noodles with the sauce and all of the ingredients in it; check the seasoning to see if you need to add any additional salt or pepper.

Finish by serving with shaved Parmesan and remaining basil to top pasta. Enjoy!

*You could also use sweet Italian sausage if your family doesn't love spicy food. Or even try it with ground turkey or beef if that's your thing. Remember to season those types of meats with salt, pepper and Italian seasoning so that it has some of flavors that a sausage would contribute.


Monday, March 4, 2013

Chocolate Raspberry Trifle

I love me a good trifle. I thought my favorite trifle recipe couldn't be topped but over the weekend I tried a new recipe, and it sort of blew the original one out of the water. I made individual trifles, because I wanted to use my little dishes but of course you could use one large trifle dish, or if you don't have a trifle dish tall drinking glasses would work too. The winning part of this dessert is the rich chocolaty custard. I think in the future I'll forgo the trifle idea and just take a spoon and the bowl of custard with me to my closet, where I'll close the door and hide from the world, while I eat the entire thing while watching reruns of the bachelor on my computer. Heaven. That's my heaven. Anyway, the chocolate raspberry combination is delicious and I love the various textures, the chewy brownies, the airy whipped cream, the juicy raspberries. It's perfection in dessert form.


 Chocolate Raspberry Trifle
 
Ingredients:
For the Brownies
 
For the Chocolate Custard
1/2 cup sugar
3 Tbsp. cocoa powder
2 Tbsp. cornstarch
pinch salt
1 3/4 cups whole milk
1/2 cup heavy cream
2 large egg yolks
5oz. bittersweet chocolate, finely chopped
2 Tbsp. unsalted butter
1 tsp. pure vanilla extract

For the Whipped Cream
2 cups heavy whipping cream
1/4 cup powdered sugar
1 tsp vanilla extract

For assembling
1-2 pints fresh raspberries
bittersweet chocolate shaved or roughly chopped for layers and/or topping


Begin by making a batch of brownies, as they cool start on the custard.

Custard directions:
In a large bowl, mix together granulated sugar, 3 tablespoons cocoa powder, cornstarch and salt. Whisk in 3/4 cup milk. In a large saucepan, bring remaining 1 cup milk and 1/2 cup cream to a boil over medium heat. Whisk hot milk mixture slowly into cocoa mixture. Return it all to saucepan. Cook over medium heat, whisking gently, until slightly thickened, about 2 minutes. (A simmering bubble or two is O.K., but do not let it boil.)

In a medium heat-resistant bowl, whisk yolks. Whisking constantly, very slowly dribble about half the cocoa-milk mixture into yolks until fully combined. Pour yolk mixture into saucepan with remaining cocoa-milk mixture, whisking constantly. Cook, whisking occasionally, over medium-low heat, until thick, about 5 minutes. (Do not let mixture come to a simmer. If pan begins to steam thickly, remove from heat for a few moments and stir well before continuing.) Let cool slightly.

Melt 5 ounces chopped chocolate with butter. Stir until smooth. Stir in vanilla. Cool 5 minutes, then fold into thickened egg mixture. Place plastic wrap directly against pudding (to prevent a skin from forming), and chill until set, about 3 hours.

Whipped cream directions:
Just before assembling, with an electric mixer, beat remaining 2 cups cream with 1/4 cup confectioners’ sugar, and vanilla until it forms mediumpeaks. Scraping sides to incorporate.


Assembly directions:
Cut cooled brownies into 1-inch squares. Fit a layer of brownie squares in bottom of a 4-quart trifle, glass, or other bowl. Top with half the pudding, a third of the whipped cream, a third of the remaining chopped chocolate and a third of the raspberries. Repeat layering until all ingredients have been used. Serve immediately, or cover with plastic wrap and chill for up to 24 hours before serving.
 
*Pudding and brownies can be made up to 5 days ahead, and refrigerated. 

Monday, February 25, 2013

Honey Mustard Glazed Chicken Thighs

Looking for a crowd pleasing, easy chicken dish? Honey mustard glazed chicken thighs is your answer. Looking for something to serve at a dinner party, or to company? Make honey mustard glazed chicken thighs with mustard cream sauce. But really you can't go wrong either way. These little beauties are great with or without sauce they remain so juicy and flavorful and make for the perfect chicken dish. If you're still using boring old boneless skinless chicken breasts try something a little different, chicken thighs are a cheaper alternative and produce richer, juicier flavor than what you get from a lean chicken breast. The best part of these chicken thighs is the last minute glaze and broil, the sticky glaze and the chicken skin get really crispy and yummy and and the meat underneath remains perfectly cooked. Serve with the yummy creamy mustard sauce or on it's own for a wonderful meal.


Honey Mustard Glazed Chicken Thighs with Mustard Cream Sauce

Chicken:
6 - 8 bone in, skin on chicken thighs
1 lemon, juiced, and quartered
1 cup olive oil
Salt and Pepper
3 tbsp honey
1 tbsp Dijon mustard

Sauce:
3 cups chicken stock
1/2 cup cream
Salt and Pepper
1 tsp Dijon mustard
1 Tbsp corn starch
1 Tbsp water

For Chicken:
In a large baking dish combine lemon juice and olive oil season with salt and pepper and toss in chicken thighs. Add the juiced lemon quarters and allow to marinate overnight, or at least 1 hour.

Preheat oven to 375 and line a sheet pan with parchment paper. Heat a large pot on the stove to medium high, sear each chicken thigh skin side first until golden brown, about 2 minutes per thigh. Place seared chicken on sheet pan skin side up and finish searing. Place chicken in the preheated oven and cook 15 minutes. While chicken cooks combine honey and 1 tbsp Dijon mustard in a small bowl. Brush each chicken thigh with honey mustard and cook 10 minutes more. Remove chicken from the oven and brush with honey mustard one more time turn the ovens broiler on and place sheet pan to the second highest position in the oven near the broiler. Turn the broiler on and broil for 5-10 more minutes watching closely to avoid burning. Temp chicken with a meat thermometer in a couple of different places to make sure it's reached and internal temperature of 165, if it has serve it, if it hasn't turn the broiler off and turn the oven back on to 350 and let it finish cooking.

For Sauce:
In the same pot that the chicken was seared in add chicken stock and bring to a simmer whisking to remove any browned bits from the bottom of the pot. Allow broth to boil for 5 minutes. Turn heat down and add cream, bring to a gentle simmer. Season with salt and pepper to taste and stir in the Dijon mustard. Let sauce continue to simmer about 5 more minutes. Stir corn starch and water together in a small bowl. Add the corn starch slurry to the sauce whisking. Simmer till thick. Taste and adjust seasoning as necessary. Serve over chicken.


Tuesday, February 19, 2013

Chicken Marsala

Chicken Marsala is one of those comforting, yummy dishes that can be dressed up or down. For example it's ease makes it a dish you could make for dinner on a week night, but it's elegance makes it appropriate to serve for a special occasion. The crispy chicken and creamy, slightly sweet sauce make for a delicious combination. Finished with bright lemon and fresh parsley, this dish will become one of your favorites too. 


Chicken Marsala
Ingredients:
4  chicken breasts
1 cup breadcrumbs (Italian work great here)
1/2 cup flour
Salt and pepper
1/4 cup vegetable oil
8 oz white mushrooms, sliced thin
1 garlic clove, minced
1 1/2 cups Marsala cooking wine
1 tbsp butter, softened
1 tbsp flour
1/2 cup heavy cream
1 lemon, juiced
2 tbs chopped fresh parsley

Pre heat oven to 350 degrees. In a shallow bowl or pie plate, combine bread crumbs, flour, salt and pepper dredge each chicken breast in flour and set aside. In a large pot heat vegetable oil until bubbling. On medium high heat cook each chicken breast until the coating is golden brown but chicken is not necessarily cooked through about 3 - 5 minutes per side, place chicken on a sheet pan and finish cooking in the oven, until chicken registers at 165 degrees internal or is no longer pink inside about 10 minutes, depending on how big the chicken breasts are.

In the same pot add a tablespoon of butter and the mushrooms cook on medium heat until the mushrooms are browned and fragrant about 5 minutes. Add the garlic and cook, about 3 minutes. Turn heat to medium low and add the Marsala wine to the pot to deglaze, it will steam (a lot), so be prepared. Whisk to loosen any stuck bits of goodness from the bottom of the pot. Let wine to simmer on medium low heat, it will reduce to about a cup, this should take 5 - 7 minutes. In a small bowl combine the soft butter and the flour to make a paste whisk it in to the reduced wine and allow it to become thick.

Finish by adding cream, lemon juice and parsley, let it combine and simmer for a minute or two. Add the chicken breasts back to the sauce and serve over garlic mashed potatoes or pasta. Enjoy!

*Marsala cooking wine can be found in the isle of the grocery store where you might find balsamic vinegar, or red wine vinegar, usually near the salad dressings. Regular Marsala wine can be used here as well. The difference between Marsala cooking wine and Marsala wine is in the alcohol content, if you're really curious about it google it. In either case the alcohol cooks out during the reduction process.

Friday, February 15, 2013

Brownie Cookies


Brownie Cookies are like little bits of heaven fallen to earth. They're soft and chewy and intensely chocolate. I'm never sure if it's more brownie, or more cookie, the flavor and texture is brownie, the shape is cookie, it's boggling to my mind, but really it doesn't matter because they're just so (freaking) good. These little cookies are the epitome of what I want just before a certain week of the month. They're easy to whip up, the dough, oh gosh the dough, don't even get me started on the dough, it's like fudge and life becomes clear and beautiful every time I sneak a spoonful, and then of course there's the finished warm chocolate cookies, perfection I tell you. Make them. Make them any old time you want but really they should be called PMS cookies, so yeah. Enjoy!


Brownie Cookies  
2 cups flour
½ cup baking cocoa
2 teaspoons baking powder
½ teaspoon salt
16 ounces semisweet chocolate, chopped (bakers chocolate works great here)
4 large eggs
2 teaspoons vanilla extract
10 tablespoons butter, softened to room temperature
1 ½ cups packed light brown sugar
½ cup granulated sugar
1 ½ cups semisweet chocolate chips
 
In a medium bowl whisk together the flour, cocoa, and baking powder, set aside.
 
In the microwave melt the chocolate for 2 minutes, stir and microwave in 20 second intervals until chocolate is melted. In a small bowl, beat the eggs and vanilla lightly with a fork, set aside.
 
In the bowl of a stand mixer beat the butter at medium speed until smooth and creamy, about 5 seconds. Add in the sugars until combined, about 45 seconds; the mixture will look granular. Reduce the speed to low and gradually beat in the egg mixture until incorporated, about 45 seconds. Add the chocolate in a steady stream and beat until combined, about 40 seconds. Scrape the bottom and sides of the bowl with a rubber spatula. With the mixer at low speed, add the dry ingredients and mix until just combined. Finally add the chocolate chips. Do not over beat. Cover with plastic wrap and let stand at room temperature until the consistency is fudge-like, about 30 minutes.
 
Meanwhile, adjust the oven racks to the upper- and lower-middle positions and preheat oven to 350 degrees. Line 2 sheets with parchment paper or silpat liners (this is pretty important – if the cookies are baked on a greased baking sheet only, they will probably stick). Roll the dough into 1 ½ inch balls and place them on the cookie sheets, spacing them about 1 ½ inches apart.
 
Bake until the edges of the cookies have just begun to set but the centers are still very soft, about 10-11 minutes, rotating the baking sheets from top to bottom halfway through the baking time. Cool the cookies on a cooling rack to cool completely.

Tuesday, January 29, 2013

French Bread

Make this bread. Just stand up from the couch, desk, floor, bed, wherever and proceed to your kitchen to make this bread. You probably already have all the ingredients and it's super easy. So just do it. This crusty outside, soft inside, french bread is fabulous. It's very easy to make and even easier to eat. I once taught a cooking class and selected this recipe to share with the class. I'm not sure if the class learned anything but I know I did and it's that this recipe is so forgiving, it would take a lot to screw it up. Some people brought stand mixers and some people brought mixing bowls and wooden spoons but they all took home beautiful loaves of french bread to proof and bake at home. This is the perfect bread to serve along side any Italian dish like this  or this , but it's great as garlic bread served with soups too, or even sliced thin and used as panini bread. Any way you eat it, it's sure to be a new favorite!
 
Ingredients:
2 1/4 cup warm water
2 Tbsp sugar
1 Tbsp yeast
1 Tbsp salt
2 Tbsp oil (canola or olive just depending on which flavor you prefer)
5 1/2 - 6 cups bread flour (All Purpose works too I've had success with both)
1 egg
1 Tbsp water
1/2 cup cornmeal
Sesame seeds (optional)
In the bowl of a stand mixer (or even a large mixing bowl, if you want an arm workout) dissolve sugar and yeast in warm water. Let this sit for a few minutes until it bubbles and looks foamy on top, about 3 minutes. Add the salt, oil and 3 cups of flour and beat well, until the flour is mixed in. Slowly add in 2 1/2 -3 more cups of flour. The dough should clean off the sides of the bowl and not be too sticky – be careful not to add too much flour. Knead for a few minutes.
 
Leave the dough in the mixer (or bowl) to rest for 10 minutes covered with a damp kitchen towel and then stir it down (turn on your mixer for 10 seconds) and then allow to rest another 10 minutes. Repeat for a total of 5 times. When the proof/mix time is over turn dough onto a floured surface and divide into two equal parts. Roll each part into a 9×13 rectangle. Roll dough up, starting from long edge of loaf to seal. 
Press the edge together with your fingers. Arrange seam side down on large baking sheet sprinkled with corn meal, allowing room for both loaves. Repeat with second part of dough. With a sharp serrated knife score the bread making shallow diagonal cuts on the top of each loaf. Cover lightly and allow to rise 30 minutes.
With a sharp serrated knife score the bread making semi-shallow diagonal cuts on the top of each loaf. Cover lightly and allow to rise 30 minutes.
 
When rise time is done brush entire surface with an egg wash (one egg beaten mixed with 1 Tbsp of water). If desired, sprinkle with sesame seeds. Bake for 25-30 minutes at 375 degrees. You'll know it's done when the crust has browned and a gentle knock on the crust sounds hollow. Remove from the oven, cool and enjoy. 
 

Thursday, January 24, 2013

Oatmeal Caramelaties

My family has been making these oatmeal caramelaties for years. I remember going to my grandparents cabin in the summers and sneaking into the laundry room (where the treats were kept) to cut myself off bites these delicious, rich, tempting bars. They are everything you want in a dessert bar, they're chewy and chocolaty and laced with caramel. They're just plain good and are my go to treat for pot lucks, party's, movie nights, welcome to the apartment complex offerings, meeting at work, church or otherwise. People just love them and they're super simple to throw together and you probably have everything on hand. Once I shared these treats at a funeral and two weeks later someone who had attended, (somehow) tracked me down specifically to get this recipe. They're memorable! Like I said people love them. And so will you!   


Oatmeal Caramelaties
Ingredients:
2 cups flour
2 cups old-fashioned oats
2 cups brown sugar
1/2 teaspoon salt
1 teaspoon baking soda
1 1/2 cup butter, melted
1/2 jar of caramel (Ice cream topping or Mrs. Richardson's works great!)
1 12-ounce package semisweet chocolate chips

Preheat the oven to 350 degree. Prepare a 9 x 13 baking dish by lining it with aluminum foil and spraying with non stick cooking spray. In a medium sized mixing bowl combine the flour, oats brown sugar, salt, baking soda, and butter.  Evenly press half of the oat mixture into the bottom of the prepared pan. Bake 10 to 15 minutes, until lightly browned.

Just before the bars come out of the oven place the jar of caramel in the microwave for 30 seconds to melt it gently. When the bars have been removed from the oven, sprinkle the chocolate chips over the crust and pour the melted caramel over the top. Sprinkle the rest of the crust over the top and press down slightly, bake in the oven for an additional 10-12 minutes, until the caramel is bubbling and edges are lightly browned. Cool completely and lift out of the pan using the foil edges. Cut into bars and serve.


Tuesday, January 15, 2013

Baked Lemon Thyme Chicken

This dish screams freshness. Right in your face it's screaming: "Hey, I'm fresh and delicious and you should make me because it's cold outside, and I will remind you of better, warmer days". And it does, it absolutely does remind me of better, warmer days (Spring, I miss you!). It's lemony and herby and is simplicity at its finest. It's really good. I made this dish for dinner on Sunday and it was so simple, we had thyme rice pilaf as well as sauteed green beans and this salad. Yum. The whole meal was just perfect. The best part of all is that the chicken is healthy as well as delicious. And it provides great leftovers - salad topped with shredded chicken, stir fry, chicken sandwich, leftovers = freaking yum. You should make this soon, you'll be so glad you did!


Baked Lemon Thyme Chicken
Ingredients:
4 large bone in, skin on chicken breasts
1/4 cup olive oil
4 cloves garlic, minced
1/2 cups chicken broth
2 tbsp white wine vinigar
1 tablespoon chopped thyme
1 1/2 teaspoons dried oregano
1 lemon juiced, and zested
4-6 sprigs of thyme
1 lemon, cut into wedges
Salt and Pepper

In a small pot heat over medium low heat olive oil, garlic, chicken broth, vinigar, chopped thyme, oregano, juice and zest from one lemon and 1 tsp salt. Warm the mixture until it becomes fragrant and simmers slightly, about 5 minutes.

When the oil mixture has finished cooking pour it into a large baking dish place chicken breasts over the oil mixture, skin side up. Using a pastry brush (or your hands) smear oil mixture over the top of the chicken breasts, till covered completely. Drizzle with a few more tablespoons of olive oil and sprinkle liberally with salt and pepper. Tuck lemon wedges and thyme sprigs around and in between chicken breasts.

Bake in a 400 degree oven for 30 - 40 minutes until the chicken is cooked through (165 degrees) and skin has become brown. Finish with a final sprinkle of salt and plate with lemon slices and extra thyme for garnish.

Monday, January 14, 2013

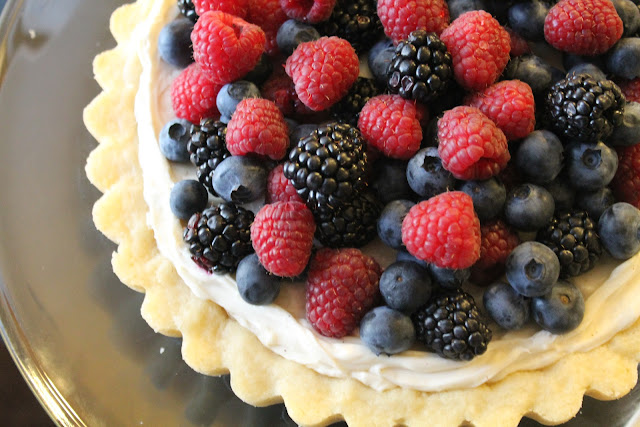
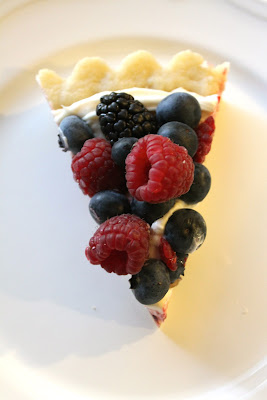
Fresh Fruit Tart

I really like fruit tarts. They make me happy. They're pretty. And yummy. And easy to make. And I can't think of a better way to end a meal. This sugar cookie-esq crust is filled with a lemon and cream cheese filling and topped with what ever fruit your little hear desires. I went with berries because I love me some berries, but you could get fancy and use kiwi and mango. Like I said whatever your heart desires. This tart comes together quickly, and easily and is always impressive.


Fresh Fruit Tart
Ingredients:

For the Crust:
1/2 cup butter, softened
2/3 cup sugar
1 egg
1 teaspoon vanilla extract
Zest of 1 lemon, divided (use the other half for the frosting)
1 1/4 cups four
1 teaspoon cream of tartar
1/2 teaspoon baking soda
1/4 teaspoon salt

For the filling:
1 package (8 ounces) cream cheese, softened
2 tablespoons granulated sugar
1/2 cup powdered sugar
1 teaspoon pure vanilla extract
1/4 teaspoon cinnamon
Fresh lemon juice from 1 lemon (1-2 tablespoons)
Other half of lemon zest from above

Fresh Fruit Topping:
Strawberries
Raspberries
Blueberries
Pineapple
Peaches
Kiwi

Preheat the oven to 350 degrees. Spray a 10-inch round cake pan or tart pan with non stick cooking spray.

In a large mixing bowl cream together the butter and sugar until smooth. Mix in egg, vanilla, and 1/2 of the lemon zest. Combine the flour, cream of tartar, baking soda and salt and add to bowl mix until just blended. Press the dough into the prepared pan, making the edges thicker than the center. Bake the dough for 10-12 minutes, or until lightly browned around the edges. Do not over bake or the crust will become dry and crumbly. The center of the crust may look undercooked, don't worry pull the crust out when the edges look done the center will set up as it cools. Cool the crust completely before adding the cream cheese filling.

In a medium mixing bowl, beat the cream cheese until smooth, and few lumps remain. Add the granulated and powdered sugar, vanilla, cinnamon, lemon juice, and other half of the lemon zest. Remove cooled crust from tart pan or cake round and using an off set spatula spread the filling onto the cooled crust to within 1/2-inch(ish) of the edges. Arrange fruit on top of the tart and cover lightly with plastic wrap. Chill until serving time.

*I would shy away from fruit like bananas or apples because they brown quickly and may look a little unappetizing.

Tuesday, January 8, 2013

Big Chocolate Chip Cookies

I've said it many (many) times on this blog that cookies are my favorite food. And truth be told I really don't think it gets any better than a big, chewy, buttery chocolate chip cookie. Does it? I've never met a chocolate chip cookie I didn't like but I certainly have my preferences and these big and tasty beauties are at the top of my list as far as yummy chocolate chip cookies goes. I have several great cc cookie recipes but this is the best as far a flavor goes. The recipe doesn't make many because hello you're making 5'' diameter cookies but you could certainly scale the size down if you needed to feed a crowd. Or if you and your husband plan on consuming each delicious cookie all by yourselves, over the course of a weekend, then make em' big, it'll save you from having to walk to the kitchen too many times to get another. Just sayin'.
 
Big Chocolate Chip Cookies
 
Ingredients:
 
12 Tablespoons butter, melted
1 cup brown sugar
1/2 cup sugar
1 egg + 1 egg yolk
1 teaspoon vanilla
1/2 teaspoon salt
1/2 teaspoon baking soda
2 cups + 2 Tablespoons flour
2 cups semisweet chocolate chips
 
Preheat oven to 325 degrees and move both oven racks to the middle two shelves in the oven. Mix the melted butter, brown sugar and sugar together in a mixing bowl until thoroughly combined.
Add egg and egg yolk and vanilla. Mix salt, baking soda and flour together, gradually add it to the wet ingredients until few streaks remain, add the chocolate chips and finish mixing dough. Using a 1/4 measuring cup shape 1/4 cup sized dough balls onto a greased cookie sheet. Leaving 2 - 3 inches between cookies and sides of pan, I usually fit about 6 - 8 cookies per sheet pan. Bake in preheated oven for 13 - 15 minutes, rotating pans half way through. (At 7 minutes, into the bake rotate pans by switching the bottom pan to the top position and vise versa and rotate the cookie sheets so that the front cookies are now at the back of the oven and vise versa.) Remove cookies from the oven when slight browning starts around the edges of the cookies (they may still look a little doughy in the center, don't worry they'll set up) and let cool on a cooling rack. Makes about 18 BIG chewy cookies.